Freelancers above all else should be masters of time, yet time management is something most of us struggle with.
We struggle with it because it’s not sexy and it’s tedious. It’s a task that most humans innately want to stay away from. I’m going to cover how you can track time effectively so that you can gain profits in your business that you had no idea were there.
Freelancers and business owners want their freedom and flexibility. At a basic level, time management is not freedom. It’s a record of exactly what you are doing at every second of the day. Plus “management” is in there, and who likes management? 😉
Time management is really just time tracking. It’s hitting the start button on a timer when you start a task and then hitting the stop button when you are done. It’s as simple as that. Yet most struggle with doing this simple task.
The tracking of the time spent gets recorded someplace and stored for when you want to review it. Without the tracking part, there’s no way to manage time. Without the review part, there’s no optimizing your time and being able to prioritize it for profit.
It’s really about being disciplined in tracking your time. Hitting that start button on the timer before starting the next task. Then hitting stop and then start again when you transition to the next task.
Often, we start tracking our time, but then a few days go by and it’s back to bouncing around from task to task again without tracking the time spent.
It doesn’t have to be complicated. Harvest, Freshbooks, Toggl and countless other time tracking pieces of software within our invoicing systems have all these bells and whistles to link in billing vs non-billable hours, allocation to a project, or segment them off into a miscellaneous bucket.
In fact, here you go, I’m tracking the time for me to write this blog post.

Keep it simple. Here’s why.
Know What You Spending Time On
Ask yourself this. How good are you at estimating how long a project takes? My guess is that most times you are off.
Even if you do project-based billing or value-based billing, there is a need to know how long something will take to complete.
 Revenue is good! Profit is great!
Without the knowledge to know how long a task will take, there is no way to know how much profit you’ll be making from the project. Yes, profit, that’s what matters.
First, I can probably do 4 or 5 $10,000 projects in the time it takes me to do the $50,000, so that would be around $20k.
Second, and this is what I like better, I can do 2 $10,000 projects for the same amount of profit as the larger project, and in about half the time. Leaving me with time to do something with my family.
The profit is the amount of money that’s left over after you take out all the costs of a project. That includes the time spent by you doing the project. So knowing how long it will take you to complete each task can only increase your chance at making a better profit.
Tracking Time in the Background Automatically
I like to keep things simple, especially when it comes to things that I don’t enjoy doing, like time tracking. My mindset as a developer is that if I have to do the same thing twice, then I need to automate it.

This works for me because it doesn’t change any flow in my every day. I’m in these apps anyway. It doesn’t even require me to open up another app to start the timer. It’s simple.
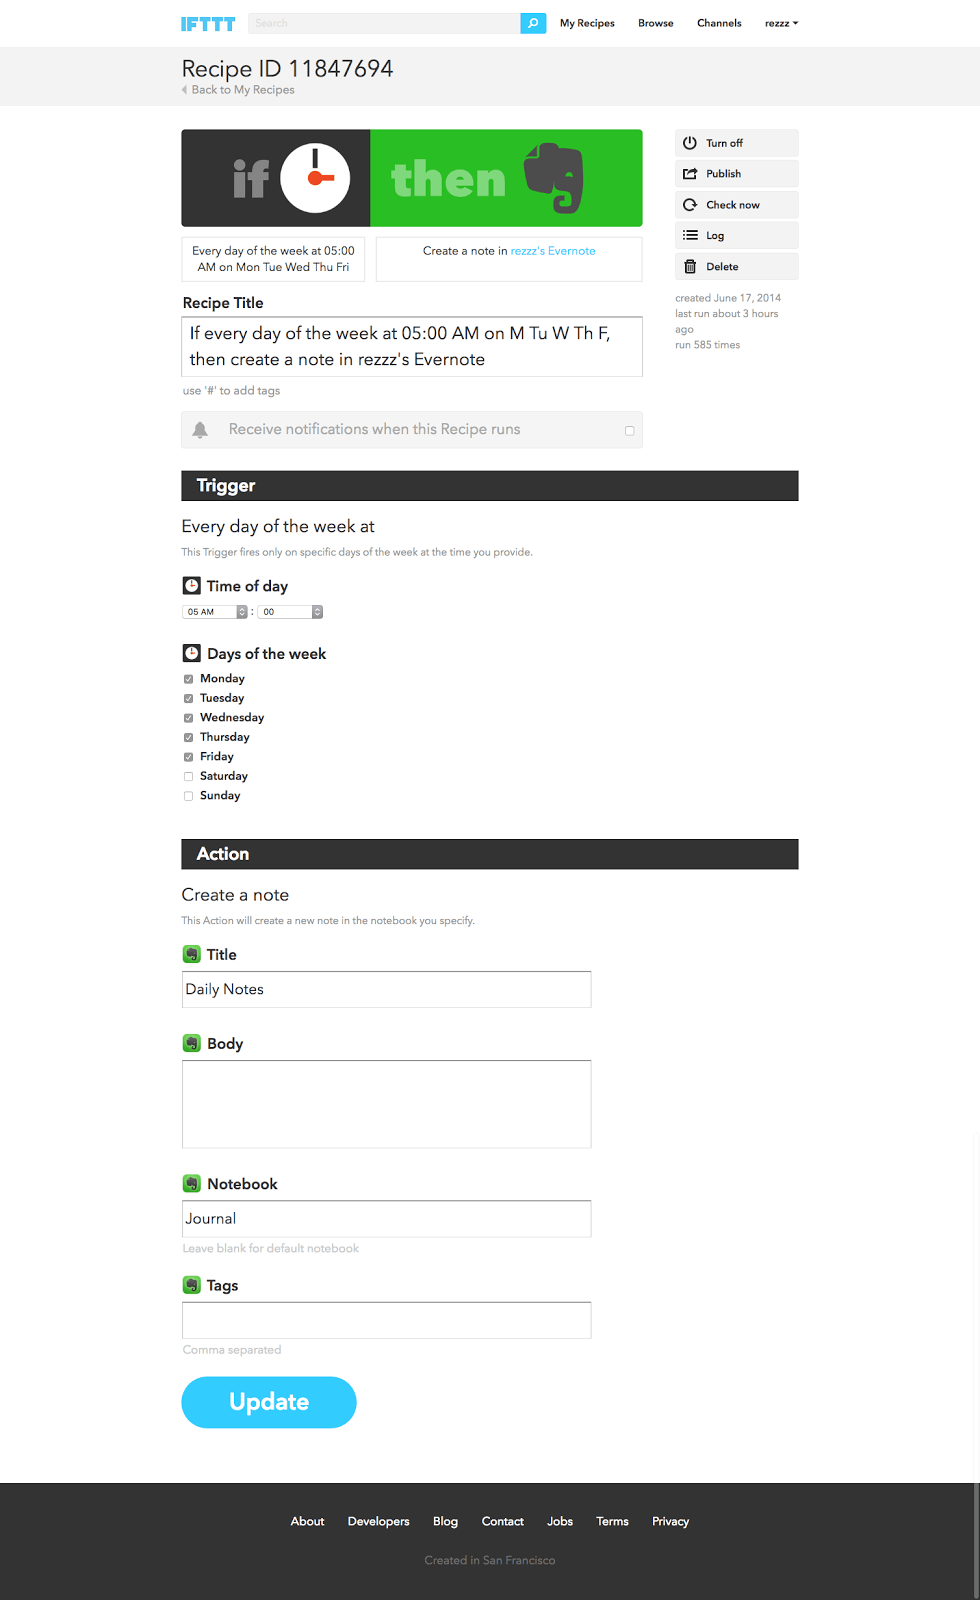
I use Evernote to be my digital brain. I have a few things happening inside of Evernote for me daily. One is that it automatically creates two notes before I wake up in the morning. Using IFTTT one called “Daily Notes” and one called “Daily Time Log”.
Daily Notes is a record of all the Todoist Items I complete each day and at what time. Daily Time Log is just what it sounds like. It is a log of all the time entries within Toggle, their description and how long it took me to do it.
Oh, and all of this happens automatically just from me clicking the start and stop buttons for Toggl. I don’t even have to open up Evernote to do any of this.
By using IFTTT, these notes get created early in the morning so that when I wake up they are there and ready to go.
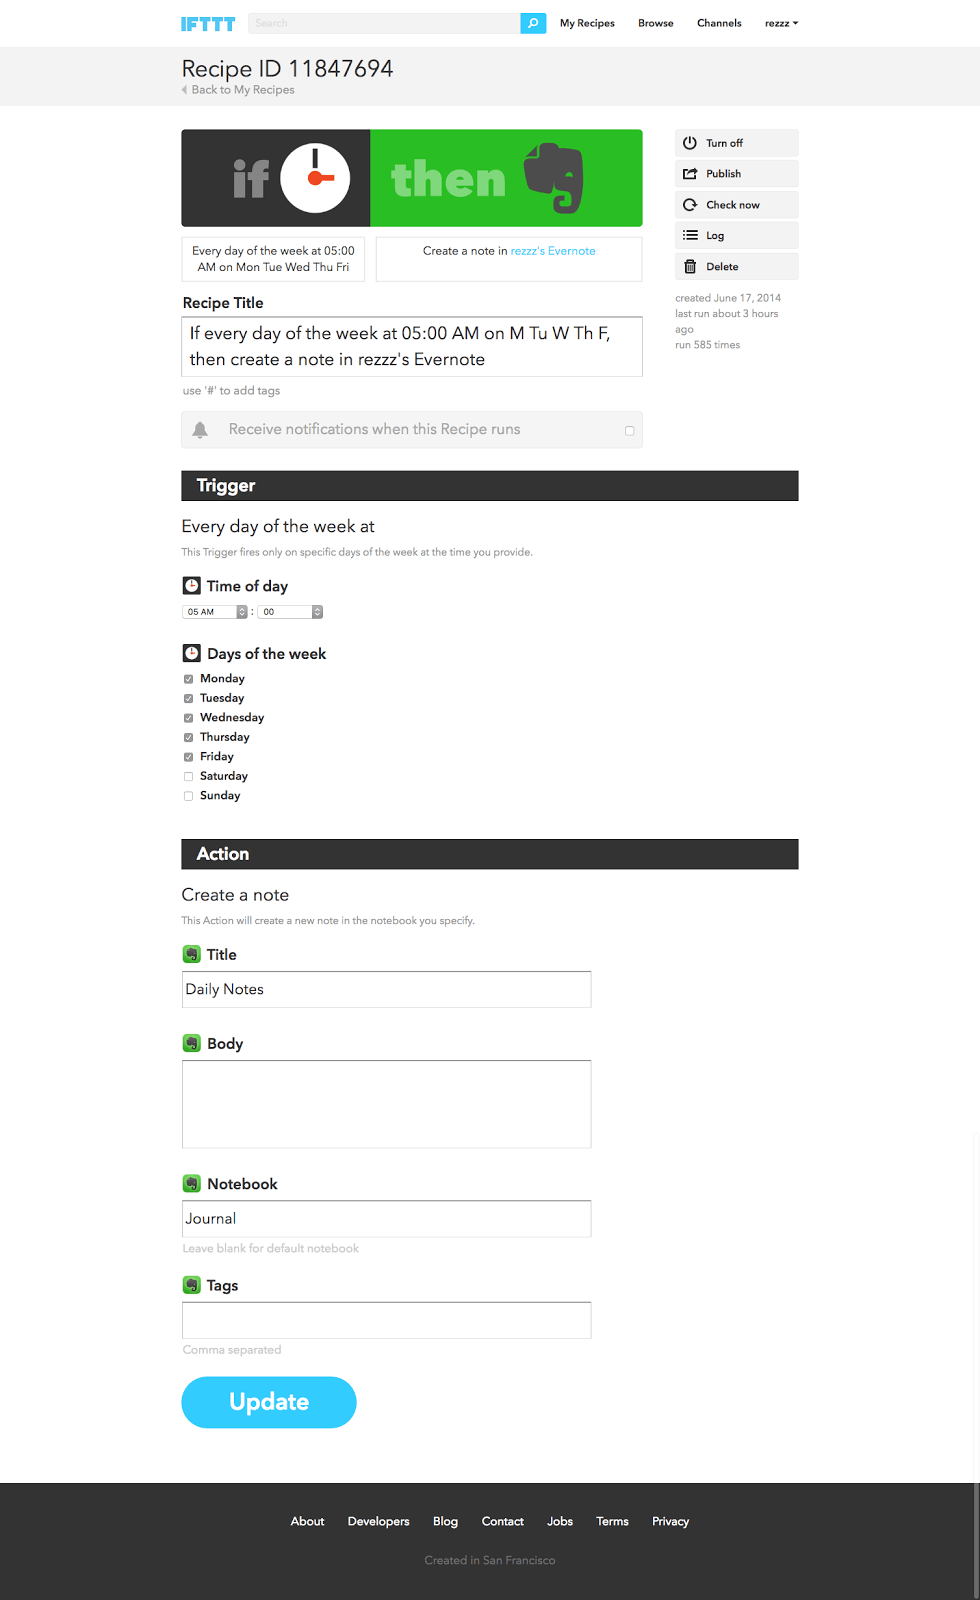
Daily Notes for me is something I use as a part of my weekly review. Daily Time Log, however, was something I set up a long time ago when I had a client who wanted me to log my time into Harvest each week. This saved me so much time because it was an easy way to just cut and paste the description, allocate it to the proper project and put in the time, all in one session at the end of the day on Friday. Easier than having to fumble around with the Harvest app all day long.
Use Time Wisely
 I even used Toggl to track the time I spent on fumbling around with Harvest. Get this, I saved 23 minutes per week (that’s 19.9 hours per year) by doing it this way. (Yikes! Almost one entire day per year inside of Harvest’s Time Tracker.) I’m so glad I tracked the time so that I can actually get that day back!
Knowing how much time you are spending on something allows an insight into time that you may not be aware of. I had no idea that I was essentially losing a day per year just tracking time in Harvest for the one client.
Having the knowledge of where your time is going allows you to optimize and prioritize your tasks in a much better way. In other words, use time more wisely.
Another scary statistic that I found was that I was spending on average four emails back and forth, which was about 13 minutes on average, when I wanted to set up a meeting time or a call with someone. Now I have one email going out and spend about 10 seconds setting up a time for a call with someone, just by using Alfred Snippets, Calendly, and Google Calendar.
Here’s how to do it…
- Go to Calendly and register for an account. You can use it free for one type of event.
- Once you create the account, then link it into your calendar. Depending on whether you use Google Calendar, Office 365, or Outlook, the setup may be different, but it’s dead simple to do.
- Set up Alfred
How to set up Alfred
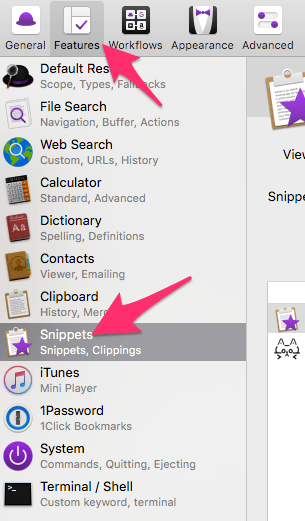
- Open up Alfred’s Preferences and Click on Features at the top.
- Then click on Snippets on the left side.
- Then click on the plus (‘+’) sign in the bottom right corner.
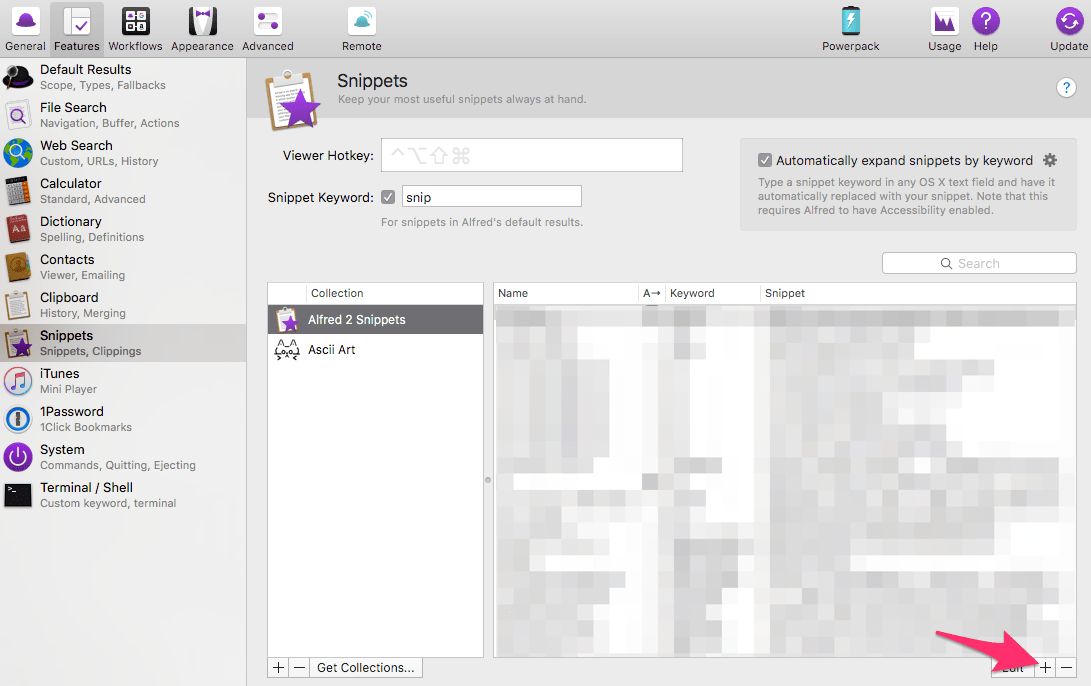
- You will then see an edit screen where you can enter in the Name of the snippet, keyword, and snippet:
Name: (can be anything you want)
Keyword: this is what you will type on the screen for the expansion of the full description
Snippet: what you want the full text to be
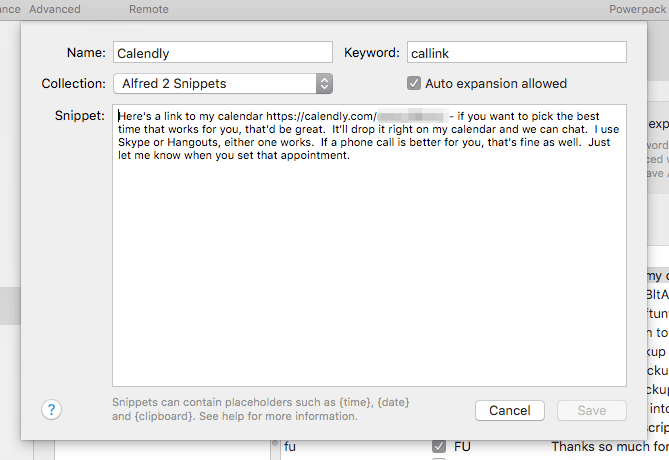
- Now all I have to so it type ‘callink’ anywhere and it will fully expand into the few sentences for someone to click on a link to pick a time that works for them.
The Daily Time Log Setup
Go ahead and set up those two IFTTT recipes above first.
Then head on over to Zapier. It’s another integration service like IFTTT where you can connect two or more applications together by actions.
Create a New Zap and call it Daily Time Log.
-
- < Name your Zap on the left anything you want, for example, “Toggl to Evernote Daily.”
- Then under “Choose Trigger App,” search for and select “Toggl.”
- Next Choose the “Trigger: New Time Entry,” then click Save + Continue
- Now Select your Toggl account if it’s listed there. Even click the Test button to make sure all is working. Then click Save + Continue.
- If not listed, then “Connect a New Account.” There will be a few quick steps to make sure you are connected.
- Then Zapier will ask you to “Test Toggl.” Go ahead and do so. It will try to find a time entry that’s been created recently. Once tested, click Continue.
- Next Choose the “Action App,” search for and select Evernote.
- Next Choose the Trigger: Append to Note, then click Save + Continue. We do this because we want to be able to just have a running log instead of a new note for every time entry.
- Then Select Your Evernote account if it’s listed there. Even click the Test button to make sure all is working. The click Save + Continue.
- If not, then Connect a New Account. There will be a few quick steps to make sure you are connected.
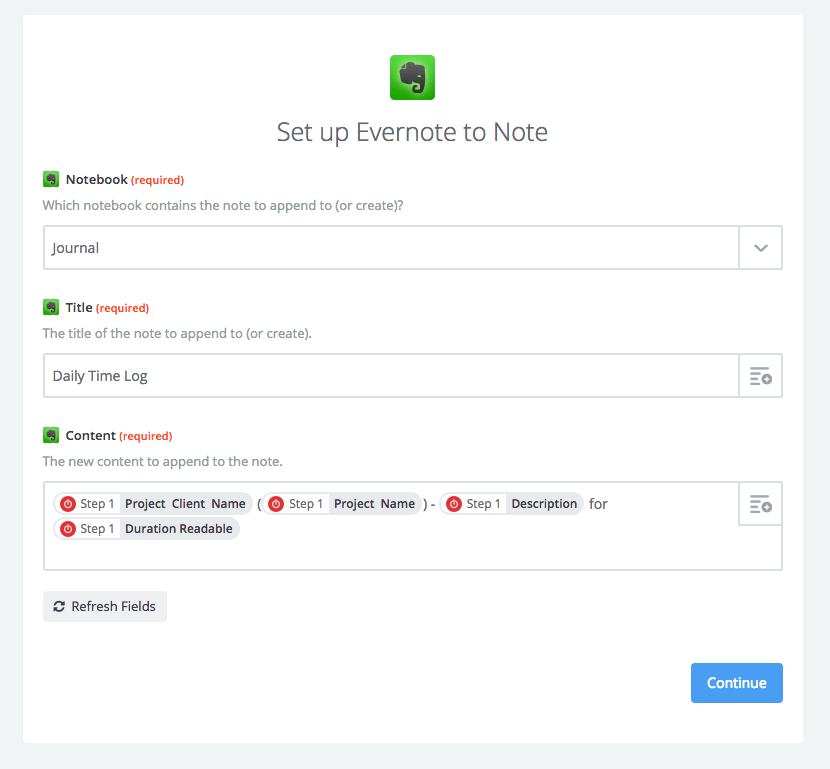
- There are three fields to Setup the Evernote to Note, first select from the dropdown the Notebook you put your Daily Time Log in.
- Then under Title, enter Daily Time Log. It’s very important to have the name (case sensitive) exactly as the note you have in Evernote already.
- Under “Content” we are going to use some of the fields with Toggl so that they match up identical to what’s in Toggl. You do this by clicking the icon in the right corner of the text box and selecting each item. For example: <Project Client Name> (<Project Name>) – <Description> for <Duration Readable>. Then click Continue.
Your finished setup to Evernote should look something like this…
Now, test the step and you should see an entry inside of Evernote with your latest time entry.
 HOMEWORK: Make it simple for yourself. Use Toggl, or use some other simple timer for the next two weeks. Just 14 days! Click the start and stop button before and after every task. Then look at what you are spending time on. I guarantee you’ll see some of your billable tasks aren’t taking as long as you thought (a good thing), but others are taking longer (terrible).
The most important takeaway of this exercise should be figuring out what are you spending time on that you can optimize to prioritize your time better.
Look for things like time tracking, administrative tasks, making appointments, logging, weekly updates to the team, making social media posts, and just about any repeatable task.
Oh and if you are curious, here’s the time entry for this article:

Just by clicking the stop on the timer, these are the results in Evernote under Daily Notes:

And Daily Time Log:

Pretty cool, huh?
Leave a comment below with something that you found from this exercise that shocked you.

